
DLP® is a light projection technology. DLP 3D printing is used to create high accuracy parts with smooth surfaces, utilizing high-performance materials which add functional properties to the produced parts.
This makes the technology highly suitable for production parts – a good alternative to injection molding for low volume manufacturing.
DLP is a digital method of projecting light, meaning it controls individual pixels on the screen: color, brightness, and contrast. At its core, DLP uses a digital micromirror device (DMD) to reflect light to the desired pixels.
First developed by Texas Instruments in 1987, a DMD is comprised of thousands of microscopic mirrors. Ten years later, Digital Projection used this technology to create the first DLP projector.
The projector can control each mirror individually to reflect light either towards the screen or away (to a beam dump). Furthermore, the mirrors can be rapidly rotated “on” and “off” to reduce the effective brightness of the color (or grayscale).

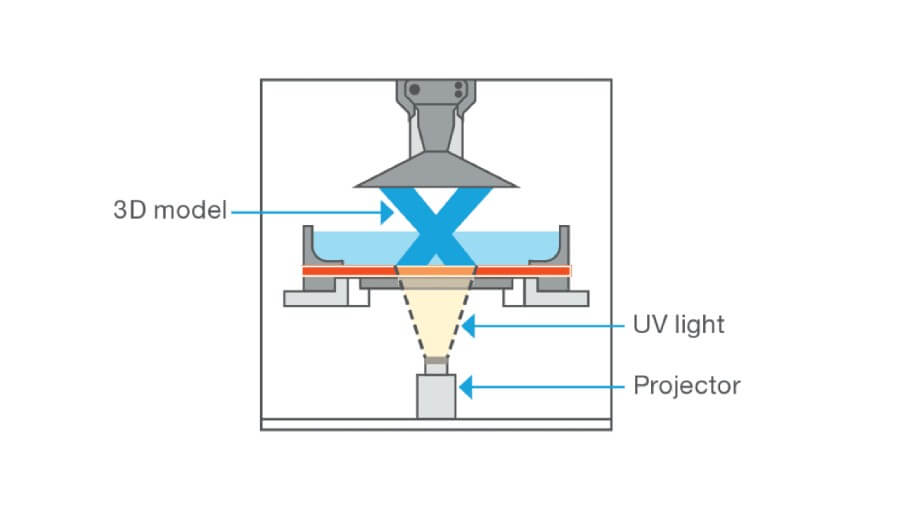
When it comes to DLP printers, the actual DLP projector is just one component (albeit a critical one) in a complex 3D printing machine. DLP 3D printers have four major components:
Here’s how they interact with each other to print a 3D part:
1. The vat contains a photopolymer resin, meaning a type of plastic that hardens when exposed to light.
2. A flexible membrane at the bottom of the vat (under the build platform) expands downwards, and a thin layer of resin flows in. 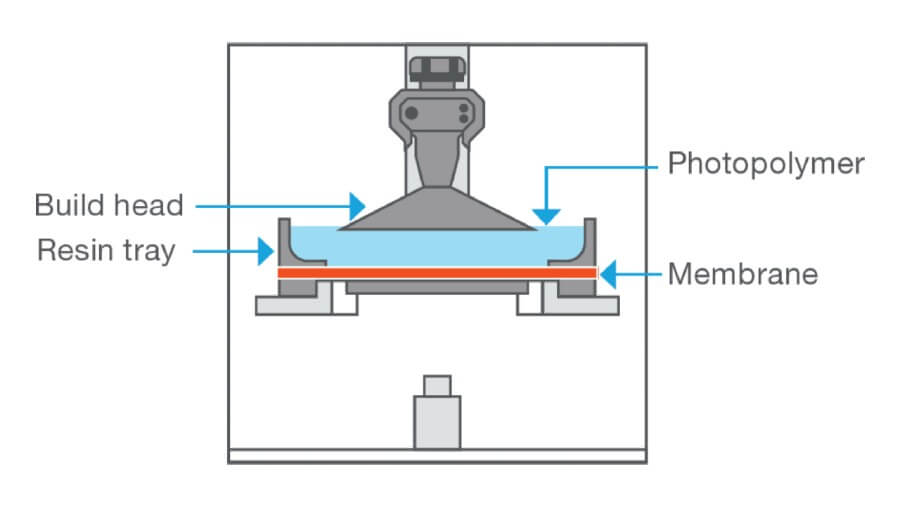
3. The DLP projector hardens an entire slice of the 3D printed part at once, by projecting an image of that slice onto the surface of the resin in the vat.
4. The membrane contracts upwards to connect to the build platform and a thin layer of resin between the membrane and the build platform is cured.
5. The build platform is raised (very slightly, this is the Z-axis resolution) to allow more resin to flow underneath.
6. Steps 2-5 are repeated for each slice until the part is complete.
Additive manufacturing (AM) can be categorized in several ways, but perhaps the simplest is to start with the material used. To grossly oversimplify, these are the material categories:
All plastic types undergo a change from a more fluid or moldable state to their “end-result” state. The primary difference between thermoplastics and thermosets is the reversibility of this change. Thermoplastics undergo a fully bidirectional process when they harden or set into a “permanent” state.
This process can be reversed to return the original raw material. By contrast, thermosets – as the name would suggest – are set in place. Once the plastic is cured, it cannot be returned to its original state.
Another way to look at it is what happens when heat is applied to the set plastic:
Any given additive manufacturing technology (usually) works with only one type of material category.
ISO recognizes seven major groups of AM technologies:
|
ISO Term |
Variations |
Material Category Used |
|
Binder jetting |
|
Metal (and other non-plastic materials) |
|
Directed energy deposition |
LDW, EBAM, LENS |
Metal |
|
Material extrusion |
FDM |
Thermoplastics |
|
Material jetting |
PolyJet |
Thermoset |
|
Powder bed fusion |
SAF |
Thermoplastics |
|
Sheet lamination |
|
Metal |
|
Vat photopolymerization |
SLA, DLP, LCD |
Thermoset |
It is clear from this overview that DLP is most closely related to other forms of vat photopolymerization. That said, it is useful to compare all forms of polymer 3D printing to see when it is best to use DLP, and when other methods would be preferred.
Every method of additive manufacturing has its pros and cons, and DLP is no exception. That said, DLP may be the best all-around technology. With most AM technologies, there’s a clear tradeoff between aesthetics and performance.
Fused deposition modeling (FDM) for example, excels when it comes to strength, performance, and durability. However, its accuracy and surface finish aren’t sufficient for certain end use parts. PolyJet on the other hand has surface finish, texture, and color that is truly best-in-class.
However, most PolyJet materials won’t stand the test of time. Each of these (and other) additive manufacturing technologies are exceptional for certain applications and should of course be used in those cases.
DLP, on the other hand, combines very good part quality with functional materials and low cost per part.
Other benefits include:

SLA shares many features with DLP:
The main differences are related to the type of UV source and direction of printing:

Schematic of LCD 3D printer, from ResearchGate
LCD is even more closely related to DLP 3D printing. In this case, both technologies use a projected image to cure each layer at once, and both technologies expose the photopolymer resin from the bottom. Here are the differences between the two:
Whereas DLP uses a projector with DMD (microscopic mirrors) to reflect UV light onto the photopolymer resin, LCD uses an array of UV LEDs that are partially masked by an LCD screen to determine which points should be cured. For this reason, LCD is sometimes called masked SLA (mSLA) 3D printing. DLP is a more mature AM technology and is based on components that are more reliable and long-lasting, if more expensive. It also provides higher irradiance than LCD, which means it can manage a wider variety of materials. LCD is susceptible to pixel bleeding and uneven degradation of the light source, which is why it’s usually seen more in hobbyist 3D printers, as they can sacrifice some level of repeatability and precision in favor of a lower cost.

At the risk of overgeneralization, let’s sum up the core differences between DLP, LCD, and SLA printers. Most of the values in the table below vary significantly based on price point, material, and other factors. However, it should provide a general idea of strengths, weaknesses, and when to use each of these 3D printing resin-based technologies:
|
|
SLA |
LCD |
DLP |
|
Light source wavelength |
355 nm |
405 nm |
385 nm |
|
High performance materials |
Broad Range |
Limited |
Broad range |
|
Print speed |
Medium/fast |
Very fast |
Fast |
|
Build size |
Small to Large |
Small to medium |
Small |
|
Price (hardware) |
Medium to high |
Low |
Medium to high |
|
Accuracy and Precision |
Excellent |
Medium |
Excellent |
|
Typical applications |
|
|
|
DLP is used in a variety of additive manufacturing applications. The common denominator is any case which requires both high part accuracy and precision, or fine surface finish, as well as a high-performance material (such as tough, rigid, elastic, or high temperature resistant materials). Here are some examples of use cases where DLP 3D printing excels:

DLP can 3D print using materials with a variety of properties. Its 385 nm UV light source is well suited to cure a wide range of resin materials. The common denominator of all compatible materials is that they must be a photopolymer. (Remember the whole process of DLP printing is based on curing resin with light.)
DLP photopolymers can be grouped into the following functional categories:
High temperature-resistant materials tend to be more brittle, whereas more elastic or tough materials tend to have lower temperature resistance. This should be kept in mind when determining the material best suited for your application.

These materials are the jack-of-all-trades when it comes to 3D printing with DLP. They have the following benefits:

Tough materials can withstand impact or repetitive motions. While their elasticity can vary, they generally share high impact strength. Tough DLP materials can be categorized by the type of thermoplastic they mimic, e.g.:

These materials mimic rubber in various forms, for application such as:
Elastomeric photopolymers are quantified by:
Generally speaking, materials with lower Shore values can stretch farther (longer elongation at break). Harder elastomers can be used for form, fit, and functional prototypes, while softer elastomers might be more commonly used in seals and gaskets.

These are DLP materials that can withstand sustained exposure to heat, typically quantified with a measurement of its heat deflection temperature (HDT). They may also be certified to handle flame, smoke, and toxicity (FST). Heat-resistant materials also tend to resist moisture well, leading to better long-term dimensional stability. Note that high temperature materials usually are more brittle than other categories of materials. Applications involving repeated strain, impact, or risk of dropping should avoid using these materials.

High accuracy and smooth surface finish make DLP suitable for printing medical devices, using special medical-grade materials that have been certified according to the relevant regulatory requirements and standards.
The above general categories can be used for many applications. For use cases that require specialized properties (e.g., ESD protection, flame retardancy), other special purpose materials can be used. These 3D materials can be delineated by the traditional thermoplastic material they replace, for example:
Design for additive manufacturing (DfAM) is the idea that 3D printing doesn’t only start with the actual printer. It starts with the design of a part. Current design is done with the limitations of traditional production methods in mind. As we’re dealing with a fundamentally different method of production, part design shouldn’t be limited by irrelevant restrictions. DfAM lets you harness the full potential of additive manufacturing.
When using additive manufacturing for production parts, designing for the technology is critical in order to tap into the true benefits of AM. Good DfAM can help you improve quality, functionality, and throughput, leading to lower overall costs and a greater number of viable applications for additive production. Furthermore, if you design for additive, you can often consolidate parts into a single, integrated part, reducing assembly labor and the quality challenges often linked to precision manual assembly processes.
Step 1 – Consider the part and application:
Step 2 – Choose an AM material:
Step 3 – Consider print part orientation:

Part orientation can also affect surface quality:
Step 4 – Consider support requirements:
Step 5 - Cleaning and post-curing:
For example, the venturi valve shown below (as a cross section) is fully self-supporting, as long as it is printed in the orientation shown at left (three ports facing downwards, one upwards). If it were printed in the other orientation, the central internal fluid outlet, (marked in red) would need support.
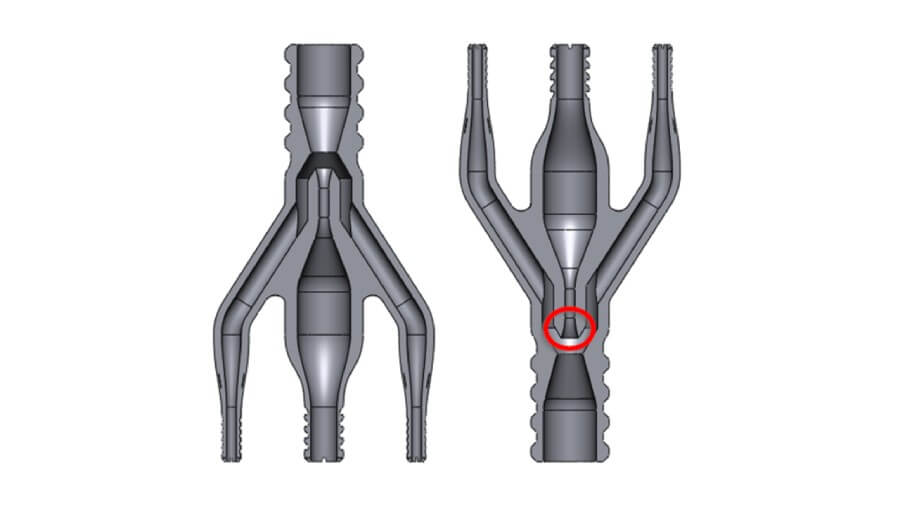
However, to print this part in volume, nesting density plays a major role. If all parts had the same orientation, fewer could fit in a single print, reducing throughput. Therefore, there was a need to use both orientations, requiring support for one of them.
Using support material in DLP is not a problem as such, but in this case, it did pose a challenge. The logical way to add support would be like this (green lines):
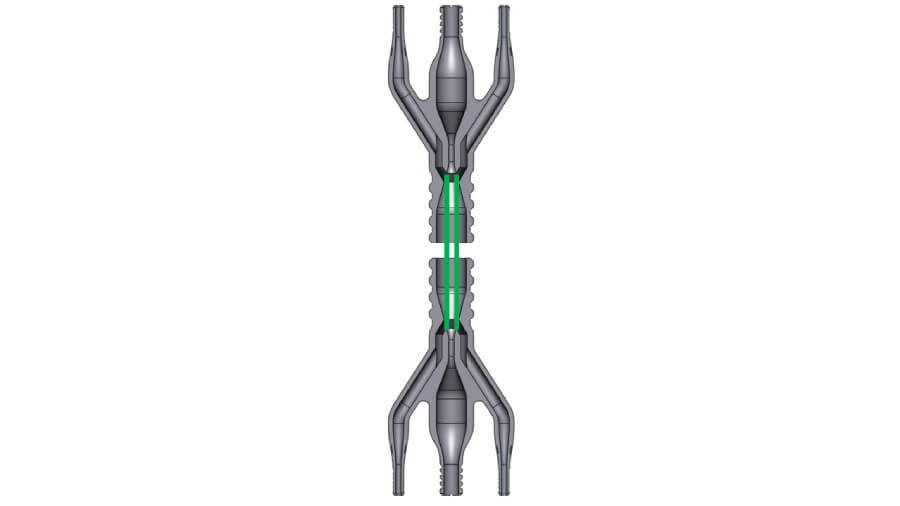
However, placing support structures inside a closed tube would make them almost impossible to cleanly remove. Instead, by slightly altering the design, the venturi valve is fully self-supporting in both orientations:
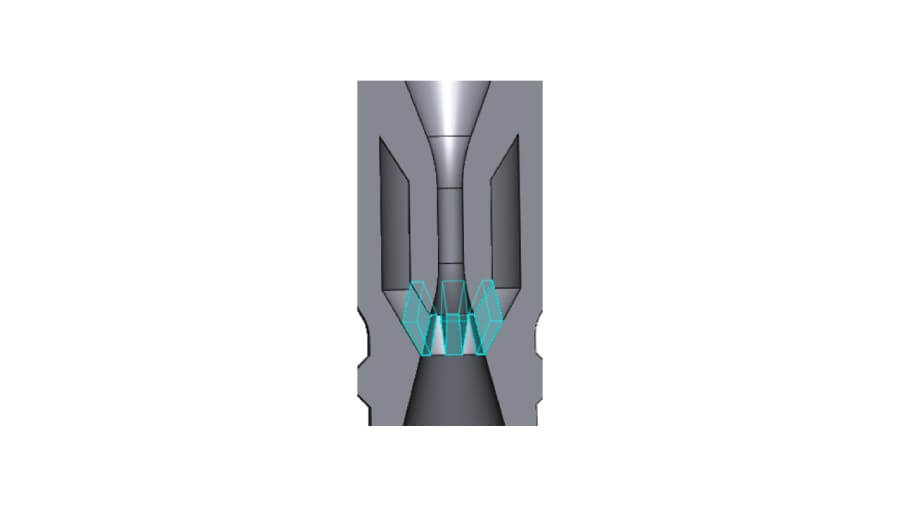
This solution adds self-supporting buttresses (highlighted blue) connecting the side wall and the central internal fluid outlet to support the unsupported port while still allowing unimpeded airflow.
DLP 3D printing technology is already used to print high quality, repeatable, fully functional parts. And it’s poised to get even better:
1. What is DLP 3D technology, and how does it work?
Digital light processing (DLP) is a display technology used in projectors and 3D printers. It uses digital micromirror devices (DMD) to reflect light and create images. In 3D printing, DLP printers use a digital light source to cure liquid resin layer by layer to build a 3D object.
2. What are common issues with DLP 3D printers?
Common issues with DLP 3D printers include poor print quality, misaligned prints, resin not curing properly, layer separation, and print failures due to incorrect exposure time or damaged projector components. (See next question to avoid these issues.)
3. How can I fix poor print quality in DLP printing?
Follow these best practices to fix poor print quality:
4. What are the advantages of DLP over other 3D printing technologies?
DLP offers faster printing speeds compared to other resin technologies like SLA, thanks to its ability to cure entire layers at once. It also delivers high-resolution prints with high accuracy (up to 50 µm in some systems), fine details, and smooth surfaces, making it ideal for intricate models, ergonomic tooling, and dental applications.
In addition, it can print high performance materials for various applications.
5. What materials can be used in DLP 3D printing?
DLP 3D printers use liquid resins that are cured by light at 385 nm wavelength. These resins come in various formulations, including general-purpose resins, tough resins, flexible resins, and biocompatible resins, allowing for different applications ranging from prototyping to low volume manufacturing.
6. Is DLP suitable for large-format 3D printing?
DLP is better suited for smaller to medium-sized prints, as it projects light onto a build platform and cures the resin layer by layer. Large prints may require longer curing times and may not be as practical with DLP technology. For large prints, other technologies like stereolithography (SLA) or fused deposition modeling (FDM) might be more efficient.
7. How precise is DLP 3D printing?
DLP technology is known for its high precision and fine detail. It can achieve print resolutions as small as 50 microns (0.05 mm), making it ideal for detailed models and end use parts, which require high accuracy and tight tolerances.
8. What industries use DLP 3D printing technology?
DLP technology is used across various industries, including automotive, aerospace, consumer applications, industrial machinery components, and others. These industries use DLP to print prototypes, manufacturing aids, and end-use production parts.
It's also widely used in healthcare for creating dental models and implants, as well as components for medical devices and equipment.
9. What are the key differences between DLP and LCD 3D printing?
10. What are the key differences between DLP and SLA 3D printing?
Both DLP and SLA use light to cure resin, but the key difference lies in how they project the light. DLP uses a digital projector to cure an entire layer at once, whereas SLA uses a laser that traces the shape of each layer.
The technologies also use different wavelengths, which require different materials, thus making them suitable for different applications. DLP tends to enable higher performance materials and be faster than SLA, while SLA enables larger parts. Both provide high-quality prints.
11. What are the key components of a DLP 3D printer?
The main components of a DLP 3D printer include the digital light source (projector), the resin vat, and the build platform (where the print is created). Heaters are optional but allow for a broader range of materials, including high performance materials.
12. Can DLP 3D printers print multiple materials at once?
Currently, most DLP 3D printers are designed to print using a single material at a time. However, some advanced systems can support multi-material printing by using different resins in different layers or by switching between resins during the print, but this is less common and requires specific setups.
P3™ is our patented version of DLP technology, using programmable photopolymerization. While all DLP 3D printers are based on the second two ‘P’s (photopolymerization), Stratasys Origin printers add a tight, closed-loop system of sensors that allow full control over the process, including:
Keeping a close eye on these parameters not only allows power users an extremely granular level of process control, but also makes for a very reliable and repeatable process. P3 DLP technology is also unique for its patented pneumatic separation mechanism. All DLP machines must have some separation mechanism, as the layers are printed at the bottom of the vat. The part is built layer by layer from the bottom up, with the platform rising slightly after each layer is printed. (See above, “Using DLP for 3D Printing.”) Without a separation mechanism, the last printed layer can stick to the bottom of the machine instead of to the build platform or partially built part.
There are various ways to overcome this issue, but not all are created equal.
The P3 patented pneumatic method applies a separation force which gradually peels the new layer off the membrane instead of releasing the full layer in one go.

P3 DLP uses a pneumatic separation mechanism to apply far less separation force. The membrane gradually peels off each cured layer as the build platform goes up.
This method has several advantages:
DLP is used in a variety of industries which require high accuracy, reliability, high quality surface finish, and high-performance materials. The main industries which use DLP successfully include:
Below are a few examples of case studies from some of our customers.
Challenge:
Solution:
Challenge:
TryTec wanted to get into the medical device business. After meeting with some medical professionals, they understood the need clearly – find a way to clean endoscopic devices, fast. They had a concept, but the geometry was very tricky. It didn’t seem suitable for injection molding.
Solution:
DLP 3D printing combined two integral attributes needed for this product to get off the ground:
Challenge:
Valiant TMS makes production automation systems in the automotive and aerospace industries. When working on a handle for manual operation, they struggled to meet all requirements in one part: ergonomic, strong, and lightweight.
Solution:
Each requirement helped to narrow down their options:
For any two of the three requirements above, there would be more freedom to pursue alternate solutions. But to meet all three, DLP 3D printing was the best (perhaps the only) solution.
See full case study here:
P3 Technology produces the right 3D printed surface finish for Valiant TMS
Building on Origin One’s excellent foundation, Origin Two made several improvements for use in manufacturing:
There’s no such thing as a magic bullet, one-size-fits-all solution to every problem. But DLP might be the closest thing when it comes to 3D printing. It offers a unique combination of high performance materials, reliability, and aesthetics.
For more information about our DLP printer Origin Two, click here.

Michal Diga, P3 (DLP) Origin Product Director at Stratasys, is an industrial engineer with over 20 years of experience in global companies from start-ups to Fortune 500s. She started as a software developer and moved to product management and business roles. Her career spans across multiple domains, driving solutions from vision to the field, with industrial manufacturing, digital transformation, enterprise software solutions, and additive manufacturing. Michal published several patents on software/IoT in manufacturing. She is passionate about solving challenges with technology to help customers succeed.


